-
Whatsapp: +86 15516933785
-
Email: hanlin@hanlinplayground.com
-
Address: Shangjie District, Zhengzhou City, Henan Province, China
-
Whatsapp: +86 15516933785
-
Email: hanlin@hanlinplayground.com
-
Address: Shangjie District, Zhengzhou City, Henan Province, China
Boosting Child Development: How to Plan a Preschool Outdoor Playground
What is the comprehensive approach to planning a preschool playground that actively fosters physical, cognitive, and social development?
Planning a developmental preschool playground requires a strategic approach that combines zoning for different energy levels with the selection of sensory-rich equipment. By integrating safety standards, inclusive design, and natural elements like outdoor classrooms, educators create an environment that actively supports physical, cognitive, and social-emotional growth.
Strategic Zoning: Creating Distinct Areas for Different Energy Levels
Strategic zoning involves dividing the outdoor environment into distinct functional areas based on the energy level and type of play required. This layout prevents high-speed activities from interfering with quiet, focused learning, ensuring safety and allowing different developmental milestones to be met simultaneously.
Effective playground planning requires more than simply placing equipment in a yard. It demands a thoughtful architectural approach known as zoning. Just as an indoor classroom has a quiet reading nook separate from the bustling block corner, the outdoors must have defined boundaries. This spatial organization directs the flow of traffic and helps children understand how to behave in different spaces. Without clear zones, a playground becomes chaotic, leading to collisions and reduced engagement.
The Active Play Zone for Gross Motor Skills
The Active Play Zone is the engine of the playground. This area targets high-energy movement, including running, jumping, and climbing. Consequently, it requires the largest amount of uninterrupted square footage. When designing this zone, you must prioritize open circulation paths. Children need space to accelerate and decelerate safely without crashing into stationary objects or other peers.
Placement is critical here. This zone should be situated away from fences where noise might disturb neighbors, yet it must be centrally visible for supervision. Think of this area as the “gymnasium” of the playground. Just as a gym has clear court lines and run-off areas, the Active Play Zone needs clear boundaries so fast-moving children do not accidentally run into a quiet observation area.
Key considerations for the Active Play Zone:
- Circulation Buffers: Ensure there is adequate clear space around the perimeter of active equipment (Use Zones).
- Surface Continuity: The ground surface here should be uniform to prevent tripping hazards during high-speed play.
- Energy Discharge: This area serves as the primary outlet for pent-up energy, allowing children to focus better when they return to quieter tasks. Consider installing climbing net playgrounds which offer high-capacity play within a defined footprint.
The Sensory Garden for Tactile and Olfactory Stimulation
In contrast to the high speed of the Active Zone, the Sensory Garden is designed for deceleration. Here, the focus shifts from whole-body movement to fine motor skills and sensory processing. This zone acts as a laboratory where children explore textures, smells, and sounds. Therefore, it should be located in a semi-enclosed area that feels distinct from the open running space.
This zone relies heavily on “transitional surfacing.” For example, moving from the rubberized surface of the active area to stepping stones, mulch, or grass signals to the child that the play style should change. The layout should encourage crouching, touching, and smelling. It mirrors the focused environment of a science center in an indoor classroom; it requires attention to detail and a slower pace. Many planners utilize wooden playground equipment in this zone to maintain a natural aesthetic and tactile experience.
Comparison of Zone Requirements:
| Feature | Active Play Zone | Sensory Garden |
|---|---|---|
| Primary Activity | Running, Climbing, Rolling | Touching, Smelling, Listening |
| Noise Level | High (Loud voices/movement) | Low to Moderate (Conversational) |
| Traffic Flow | Fast, linear movement | Slow, meandering movement |
| Space Needs | Large open areas | Smaller, intimate pockets |
The Dramatic Play Area for Social and Emotional Growth
The Dramatic Play Area serves as the stage for social interaction and imagination. This zone supports role-playing, which is essential for developing empathy and language skills. Unlike the Active Zone where play is often parallel (side-by-side), this area encourages cooperative play. Therefore, the layout must foster communication.
To function effectively, this zone requires a sense of enclosure. Children play “house” or “shop” more effectively when they feel they are inside a specific place. You can achieve this using low hedges, planter boxes, or timber borders. These physical boundaries create “rooms” without blocking the teacher’s line of sight.
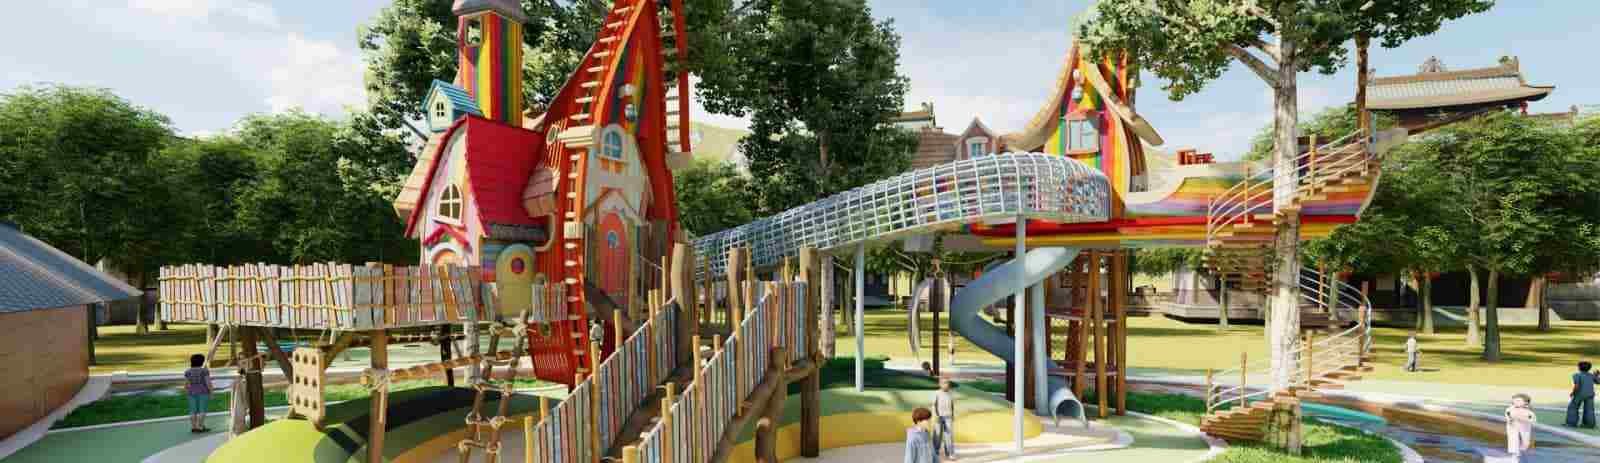
Furthermore, acoustic management is vital here. If this area is too close to the loud Active Zone, children cannot hear each other negotiate the rules of their game. It should be positioned as a buffer zone between the high-energy active areas and the low-energy quiet corners. Integrating outdoor theme playground structures, such as castles or ships, can instantly provide the backdrop needed to spark these imaginative scenarios.
The Quiet Corner for Observation and Rest
Every playground needs a place for decompression. The Quiet Corner provides a sanctuary for children who may feel overstimulated by the noise and chaos of the main yard. This zone is critical for self-regulation. It allows a child to step back, observe their peers from a distance, and recharge before rejoining the group.
Ideally, this zone is located on the periphery of the playground. It should have a physical backing, such as a fence or a wall, to provide a sense of security—a concept known in design as “prospect and refuge.” This allows the child to look out at the playground (prospect) while feeling their back is protected (refuge).
Essential elements for the Quiet Corner layout:
- Visual Barriers: Use landscaping to partially screen the view of the active zone, reducing visual stimuli.
- Shadow and Shelter: This area should be shaded to encourage physically cooling down.
- Defined Seating: Fixed seating or defined spots help ground the child, signaling that this is a place to sit, not run.
By establishing this zone, you acknowledge that rest is a valid form of playground engagement, supporting diverse learning styles and temperaments.
Selecting Features that Maximize Developmental Benefits
Selecting features that maximize developmental benefits involves integrating structures that specifically target the vestibular, proprioceptive, and tactile sensory systems. By choosing equipment that requires varied physical movements and social cooperation, educators transform the playground into an extension of the developmental curriculum.
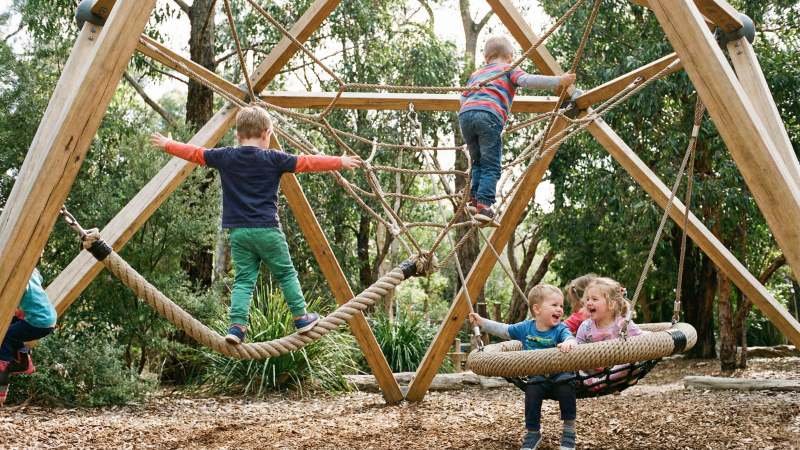
Climbing and Balancing Equipment for Vestibular Input
The vestibular system, located in the inner ear, controls balance and spatial orientation. It is the foundation for all other sensory processing. Therefore, climbing and balancing equipment acts as the primary tool for calibrating this system. Unlike a flat running track, vertical equipment forces children to calculate risk and body positioning against gravity.
When a child navigates a complex climber, they are not just exercising muscles; they are solving a spatial puzzle. This is similar to how they solve a puzzle on a table indoors, but here, their own body is the puzzle piece. Effective equipment for this purpose includes:
- Geodesic Domes: These structures offer multiple routes of travel, requiring decision-making at every node.
- Balance Beams: These isolate the center of gravity, forcing the brain to make rapid micro-adjustments to stay upright.
- Rope Climbers: Unlike rigid steel bars, ropes shift when moved. This dynamic reaction demands higher engagement from the child’s core muscles to maintain stability.
Note: The “Critical Fall Height” rating for climbing equipment dictates the depth of the safety surfacing required underneath. This is a critical safety specification that must be matched exactly to the equipment height.
Sand and Water Stations for Fine Motor Practice
Fine motor skills involve the coordination of small muscles in the hands and fingers. While climbing builds “gross” motor skills (large muscles), sand and water stations function as the outdoor equivalent of a classroom writing center. Manipulating these materials strengthens the specific hand muscles eventually required for holding a pencil and writing.
Effective sand and water tables lift these materials off the ground, making them accessible and defined. The mechanical action of pouring water from a pitcher into a funnel requires precise hand-eye coordination. Similarly, sifting dry sand through a mesh screen requires a steady, controlled grip.
Developmental Actions at Sand/Water Stations:
| Action | Muscle Group / Skill Targeted | Classroom Equivalent |
|---|---|---|
| Scooping & Pouring | Wrist rotation and forearm stability | Turning a doorknob or opening a jar |
| Molding Wet Sand | Palmar arches (palm muscles) | Squeezing clay or playdough |
| Pinching Tiny Objects | Pincer grasp (thumb and index finger) | Holding a crayon or buttoning a shirt |
Multi-User Swings and Spinners for Collaborative Play
Traditional playgrounds often feature single-user equipment, which leads to parallel play (playing near others) rather than cooperative play (playing with others). To boost social development, you must select equipment that physically accommodates multiple children or requires teamwork to operate.
A prime example is the “bird’s nest” swing or a basket swing. Unlike a standard belt swing that isolates a child, a basket swing allows several children to sit or lie down together. This physical proximity forces them to communicate to coordinate their movement. They must agree on how high to go or which direction to spin.
Spinners and merry-go-rounds also serve this function explicitly. One group of children must push to generate momentum while others ride. This establishes a clear cause-and-effect relationship based on social cooperation. The riders learn to trust the pushers, and the pushers learn to gauge the comfort level of the riders, fostering empathy in real-time.
Musical and Art Installations for Creative Expression
Not every child engages through physical exertion. For some, development occurs best through auditory and visual expression. Integrating permanent musical instruments and art panels diversifies the playground’s appeal and supports cognitive development through pattern recognition. Interactive features like 3D pin walls provide immediate tactile feedback and allow children to leave temporary “sculptures” of their own bodies or objects.
Outdoor musical instruments, such as tuned xylophones or metallophones, are distinct from random noise-makers. They are precision-engineered to produce harmonic scales. When a child strikes a key, they receive instant auditory feedback. This interaction is comparable to a physics lesson: “If I hit this large bar, the sound is low; if I hit this small bar, the sound is high.”
Benefits of Outdoor Creative Stations:
- Auditory Discrimination: Learning to distinguish between pitch and volume.
- Emotional Release: Non-verbal children can express complex feelings through sound or color.
- Cross-Modal Learning: Hitting a drum combines motor planning (movement) with auditory processing (hearing).
Embracing the Outdoor Classroom and Nature Concept
Embracing the outdoor classroom concept involves replacing static equipment with dynamic natural elements and flexible learning stations. This approach shifts the playground from a mere recreation space to an active learning environment, significantly enhancing cognitive flexibility and scientific inquiry skills through direct engagement with the physical world.
Incorporating Loose Parts for Open-Ended Learning
“Loose parts” refers to materials that can be moved, carried, combined, redesigned, lined up, and taken apart in multiple ways. Unlike a fixed slide that has only one function, loose parts function like the raw materials on a construction site. According to the National Association for the Education of Young Children (NAEYC), these materials empower children to become the architects of their own play and support divergent thinking.
From a planning perspective, incorporating loose parts requires a different mindset than installing fixed structures. You are not buying a “machine”; you are stocking a “workshop.” These items fall into two categories:
- Natural Parts: Pinecones, tree cookies (wood slices), stones, sticks, and shells.
- Synthetic Parts: Crates, buckets, PVC pipes, fabric scraps, and planks.
The Logistics of Storage
The biggest challenge with loose parts is not acquisition, but organization. Without a designated storage system, the playground quickly becomes cluttered. Therefore, effective planning must include accessible storage solutions. This is similar to how a teacher organizes art supplies or manipulatives indoors; every item needs a clear “home” so learning can proceed efficiently.
You should design low-profile sheds or weather-resistant bins directly into the landscape. These storage units allow children to self-select materials and, crucially, put them away. This process teaches responsibility and categorization.
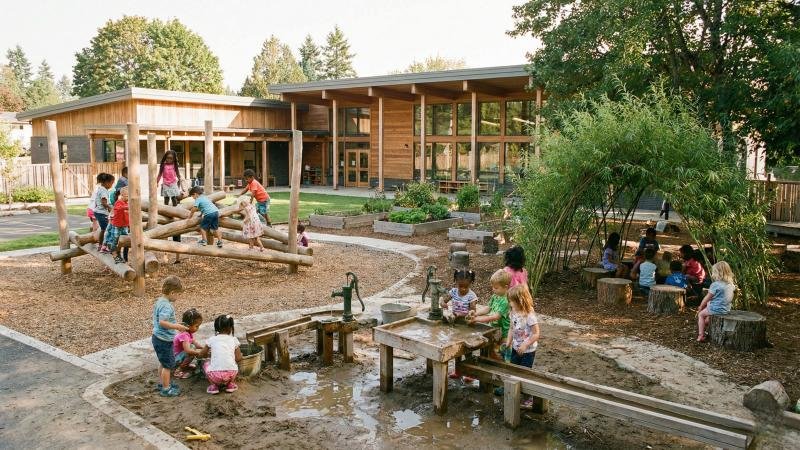
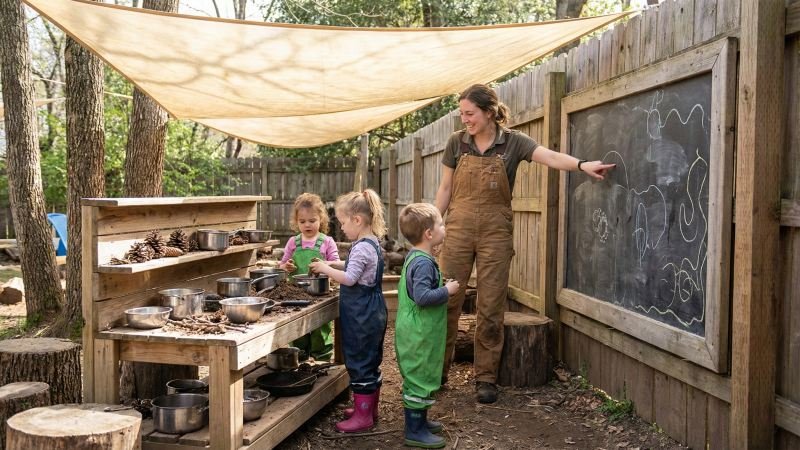
Designing Mud Kitchens for Messy Play and Experimentation
A mud kitchen is far more than a place to get dirty; it is a rudimentary chemistry lab. Here, children mix soil, water, and organic matter to observe changes in texture and state. When planning this feature, you must treat it as a permanent installation with specific infrastructure requirements.
Critical Components of a Functional Mud Kitchen:
- Work Surfaces: Durable countertops are essential. Stainless steel or HDPE (High-Density Polyethylene) plastic are preferred over untreated wood, which encourages bacterial growth.
- Water Source: A mud kitchen without water is just a dirt pile. Plan for a nearby hose bib, a gravity-fed water barrel, or a hand-pump system.
- Drainage: The ground beneath the kitchen must handle spillover. Using a gravel pit or French drain system underneath the standing area prevents the creation of stagnant puddles.
Material Durability and Selection
If you choose wood for the frame, select naturally rot-resistant species like Cedar or Black Locust. Avoid standard pine unless it is pressure-treated with non-toxic preservatives suitable for human contact.
Bringing Indoor Curriculums to Outdoor Learning Stations
The goal of an outdoor classroom is to break down the walls of the school. To do this, you must build infrastructure that supports traditional learning activities—reading, art, and science—in an open-air setting. This requires creating “nodes” that protect students and materials from the elements.
Infrastructure Requirements for Outdoor Learning:
- Weatherproof Writing Surfaces: Install acrylic panels or marine-grade chalkboards on fences. This allows teachers to conduct lessons vertically, just as they would indoors.
- Shade Structures: You cannot teach effectively in direct sunlight. Utilize shade sails, pergolas, or mature tree canopies to create comfortable microclimates for seated focus.
- Defined Seating: Use log rounds, boulders, or composite benches to create an amphitheater arrangement. This focuses attention on the instructor.
Adapting the Curriculum Environment
The following table illustrates how to translate indoor learning stations into outdoor equivalents:
| Indoor Station | Outdoor Adaptation | Planning Requirement |
|---|---|---|
| Library Corner | Reading Gazebo | Waterproof storage box for books; raised flooring to keep feet dry. |
| Art Easel | Plexiglass Paint Wall | Easy-to-clean surface; nearby water source for washing brushes. |
| Science Table | Nature Lab Bench | Magnifying glasses mounted on cables; deep basins for collecting specimens. |
By building these stations, you validate the outdoors as a place of serious inquiry. Teachers will be more likely to bring their lesson plans outside if the environment supports their logistical needs.
Essential Safety and Accessibility Standards
Essential safety and accessibility standards require adhering to CPSC guidelines for impact-attenuating surfacing and ADA regulations for accessible routes. Planners must install surfacing that matches the equipment’s Critical Fall Height, construct firm pathways at least 60 inches wide for mobility devices, and eliminate visual obstructions to guarantee constant adult supervision.

Selecting Appropriate Surfacing Materials for Fall Protection
The ground surface is the most critical safety feature on any playground. According to data from Safe Kids Worldwide, over 70% of playground injuries result from falls to the ground. Therefore, you must select materials designed for “impact attenuation.” This means the material absorbs the shock of a fall, much like a thick gymnastics mat absorbs the impact of a landing.
You cannot simply plant grass under a climbing frame. Grass and dirt pack down over time, becoming as hard as concrete. Instead, you must use specific “safety surfacing.” There are two main categories:
- Unitary Surfacing: These are solid, smooth surfaces like Poured-in-Place (PIP) rubber or bonded rubber tiles. They are excellent for accessibility because wheelchairs roll easily over them.
- Loose-Fill Surfacing: This includes Engineered Wood Fiber (EWF) or rubber mulch. These materials move when stepped on. They are generally cheaper upfront but require more maintenance to keep the depth correct.
The Concept of Critical Fall Height
You must match the surface to the equipment, a core principle outlined in CPSC guidelines. This is called the Critical Fall Height (CFH) rating. If a slide is 6 feet high, the surface underneath must be rated to protect a child falling from 6 feet.
Comparison of Common Safety Surfaces:
| Material | Cost Profile | Maintenance Need | Impact Absorption | Accessibility |
|---|---|---|---|---|
| Poured-in-Place Rubber | High Initial Cost | Low (Cleaning) | Excellent | Superior |
| Rubber Tiles | Medium/High Cost | Low (Checking seams) | Good | Good |
| Engineered Wood Fiber | Low Initial Cost | High (Raking/Topping off) | Good (if maintained) | Fair (requires compaction) |
| Sand/Pea Gravel | Low Initial Cost | High (Sanitizing/Raking) | Variable | Poor (wheels sink) |
Note: The impact attenuation rating (HIC score) for specific materials varies by supplier and depth. Always request laboratory test certificates (ASTM F1292) to confirm the surfacing meets the fall height requirements.
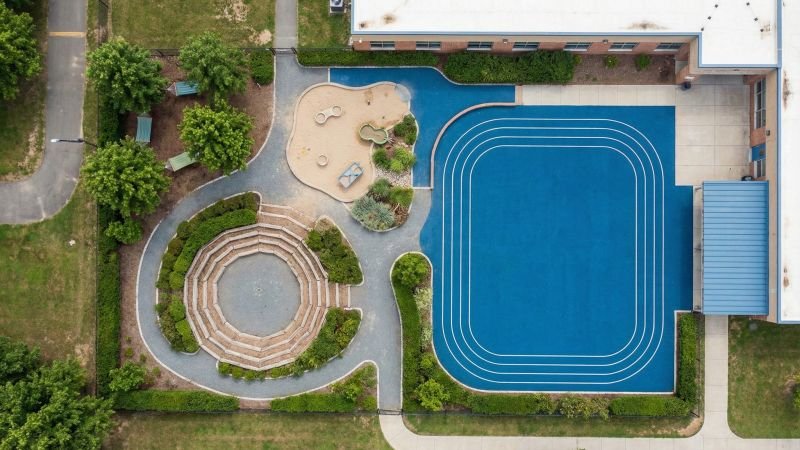
Designing Inclusive Pathways for All Abilities
A playground is only beneficial if every child can get to it. In the industry, this is known as the “Accessible Route.” This refers to the continuous path connecting the school building to the playground entry and then to the play equipment.
According to ADA (Americans with Disabilities Act) standards, these pathways must be “firm, stable, and slip-resistant.” A wheelchair should not sink into the ground. Concrete or asphalt are the most reliable options for these main arteries.
Width and Slope are Key
The pathway should be wide enough for two wheelchairs to pass each other. A width of 60 inches is the standard recommendation for high-traffic areas. This prevents traffic jams and social exclusion.
Furthermore, you must manage the slope. If a path is too steep, a child using a walker or crutches cannot navigate it safely.
- Running Slope: The path should not rise more than 1 foot for every 20 feet of length (1:20 ratio).
- Cross Slope: The path should be relatively flat side-to-side (max 1:48) to prevent wheelchairs from drifting into the grass.
You must also consider the “flush transition.” This is the point where the concrete path meets the safety surfacing. There cannot be a lip or a drop-off. A lip higher than half an inch can stop a wheelchair instantly, causing a hazard.
Maintaining Sightlines for Effective Supervision
Equipment layout dictates how well teachers can supervise the children. In the playground design industry, this is called “maintainability of sightlines.” A teacher standing in one spot should be able to scan the entire area without moving.
Eliminate Blind Spots
Large, solid structures create visual barriers. If you place a solid playhouse in the center of the yard, you create a “blind spot” behind it. A child could be injured or hidden from view in that shadow.
To solve this, push large, solid structures to the perimeter of the playground (against the fence). Keep the center of the playground open or fill it with low-profile equipment like balance beams or spinners.
Transparency in Equipment
Choose equipment designed with visibility in mind.
- Use Slots and Windows: Select tunnels that have bubble windows or slat openings. This allows light in and lets teachers see who is inside.
- See-Through Panels: Use clear polycarbonate panels or wire mesh for bridge barriers instead of solid plastic or wood.
- Elevated Visibility: Ensure that the highest decks on climbing structures allow an adult on the ground to see the child’s face.
Think of the teacher like a lifeguard on a beach. The design of the environment must support their ability to react instantly. If they cannot see a child, they cannot ensure their safety.
From Vision to Reality: The Planning Checklist
A comprehensive planning checklist transforms a vision into reality by first assessing site topography for drainage and utility lines, then establishing a detailed budget that accounts for equipment, surfacing, and installation costs. Finally, phasing the project ensures long-term sustainability by prioritizing essential infrastructure before adding modular components as funding becomes available.
Assessing Site Topography and Environmental Factors
Before choosing a single slide, you must understand the land beneath it. In the construction industry, this is called “site analysis.” Just as you cannot build a safe structure on a swamp, you cannot install a playground on unstable or uneven ground without preparation.
Drainage and Slope
Water management is the most critical environmental factor. If your site has poor drainage, your safety surfacing will fail. For example, Engineered Wood Fiber (EWF) floats. If water pools in the playground area during a storm, your surfacing will wash away, leaving dangerous concrete footings exposed.
You need to determine the “grade” or slope of the land. A perfectly flat site is rare. Usually, professional installers must perform “grading,” which involves moving earth to create a level pad while ensuring water flows away from the play area.
Sub-Surface Utilities
You must know what is buried underground. Playgrounds require digging deep holes for concrete footings (often 36 inches or deeper). Hitting a gas line, water pipe, or fiber optic cable is dangerous and expensive. Before any design is finalized, you must locate all underground utilities.
Solar Orientation
Consider where the sun hits the site at different times of day.
- Morning Sun: Usually cooler and pleasant.
- Mid-Day/Afternoon Sun: Can heat plastic and metal equipment to dangerous temperatures.
If your site faces direct afternoon sun, you must plan for shade structures or position metal slides facing away from the sun’s path to prevent burns.
Establishing a Budget for Equipment and Installation
A common mistake is assuming the catalog price of the equipment is the total cost of the project. In reality, the equipment itself often represents only about half of the total budget. The rest goes to site preparation, shipping, installation, and surfacing.
To avoid running out of money halfway through, you must budget for the “Total Project Cost.”
The Hidden Costs of Construction
- Freight: Playground equipment is heavy and bulky. It ships on large pallets via semi-trucks. Shipping costs can be significant depending on the distance from the factory.
- Off-loading: When the truck arrives, you often need a forklift to get the equipment off. If the school does not have one, you must rent one or pay for a lift-gate service.
- Installation Labor: Certified installers (CPSI) charge for their expertise and insurance.
- Site Security: You may need temporary fencing to keep children out of the construction zone while concrete cures.
Budget Breakdown Example
The following table illustrates a typical budget distribution for a medium-sized project.
| Cost Category | Percentage of Budget | What it Includes |
|---|---|---|
| Play Equipment | 45% – 50% | Slides, climbers, swings (the hardware). |
| Surfacing | 15% – 25% | Wood fiber, rubber mulch, or poured rubber. |
| Installation | 20% – 25% | Labor, concrete, assembly, heavy machinery. |
| Site Prep & Freight | 10% – 15% | Grading, shipping, permits, fencing. |
Note: These percentages are industry estimates. Costs for freight and raw materials like steel and concrete fluctuate based on market conditions and fuel prices. Always request a “turnkey” quote from your supplier that includes all these line items to get an accurate number.
Phasing the Project for Long-Term Sustainability
If your vision exceeds your current budget, do not buy cheaper, lower-quality equipment to fill the space. Instead, use a strategy called “phasing.” This means designing the “Master Plan”—the perfect final version of the playground—but building it in stages.
Phase 1: Infrastructure and Anchors
In the first phase, focus on the things that are hard to change later. This is like building the frame of a house before adding the furniture.
- Site Work: distinct boundaries, drainage, and the main concrete curbing should be done for the whole area, even if parts stay empty for now.
- Surfacing: Install safety surfacing for the entire zone if possible, or create a distinct border for the active area.
- Anchor Piece: Install the main composite structure (the big climber/slide unit) that serves as the centerpiece.
Phase 2 and 3: Modularity
Once the main structure is in, you can add freestanding items as you raise more funds.
- Freestanding Items: Spinners, spring riders, or sensory panels can be added later.
- Amenities: Benches, trash receptacles, and shade structures can be installed in subsequent years.
The “Post-and-Platform” Advantage
Many modern playground systems are modular. You can install a small tower now and plan to attach a bridge and a second tower three years from now. By planning for this connection point in the original design (leaving a “stub” or an open clamp), you ensure the playground can grow with your school without needing to tear anything down.
Conclusion
Planning a preschool outdoor playground is an investment in the future of the children who will use it. By shifting the focus from purchasing equipment to designing developmental zones, you create an environment that nurtures physical health, cognitive flexibility, and social cooperation. Whether through a sensory garden, a mud kitchen, or a carefully phased master plan, every design choice you make today lays the groundwork for critical early childhood milestones. Start with a solid assessment of your site, adhere to safety standards, and embrace the potential of the outdoors as a powerful classroom.