-
Whatsapp: +86 15516933785
-
Email: hanlin@hanlinplayground.com
-
Address: Shangjie District, Zhengzhou City, Henan Province, China
-
Whatsapp: +86 15516933785
-
Email: hanlin@hanlinplayground.com
-
Address: Shangjie District, Zhengzhou City, Henan Province, China


Commercial Outdoor Playground Equipment: 5 Key Safety Standards You Must Know

When planning a commercial outdoor playground, keeping children safe while minimizing liability is the top priority for any school, park, or facility manager. In the United States, playground safety is primarily guided by ASTM F1487 standards and CPSC guidelines.
These comprehensive rules cover everything from the ground children play on to the hardware holding the equipment together. Let’s break down the five most critical safety standards you need to know to maintain a compliant, safe, and engaging play environment.
Standard 1: Protective Surfacing and Impact Attenuation
Protective surfacing is arguably the most important safety investment for any playground, as accidental falls account for the vast majority of injuries.
CPSC and ASTM F1292 guidelines emphasize that the ground beneath the equipment is a child’s primary defense against severe head injuries. To meet compliance, your surfacing material must have a Critical Fall Height (CFH) rating that matches or exceeds the highest accessible point of your play structure. This ensures the surface can absorb enough impact to keep Head Injury Criterion (HIC) scores below the critical threshold of 1000.

Critical Fall Height Requirements for Loose Fill Materials
In playground design, gravity dictates safety. If your slide deck is 8 feet off the ground, your surfacing must be rated to protect a child falling from at least that height. If the loose-fill material is too shallow, the impact force transfers directly to the child instead of being safely absorbed.
Here is a look at the protection provided by common materials at a properly maintained, compressed depth of 9 inches, based on CPSC Publication 325:
Fall Protection by Material Type (9-Inch Compressed Depth)
| Material Type | Critical Fall Height Protection |
|---|---|
| Engineered Wood Fiber (EWF) | Up to 10 feet |
| Rubber Mulch (Loose Fill) | Up to 10-12 feet (Varies by product) |
| Sand (Coarse/Fine) | Up to 4 feet |
| Pea Gravel | Up to 5 feet |
Note: Sand and pea gravel offer significantly less impact attenuation than EWF or rubber mulch, making them unsuitable for tall commercial structures.
Shock Absorbency Ratings for Unitary Surfaces
Unitary surfaces like poured-in-place (PIP) rubber, bonded rubber, and synthetic turf aren’t judged by a simple ruler depth. Because they are engineered systems, they rely on precise laboratory drop tests to prove their safety.
Two primary metrics matter here:
- HIC (Head Injury Criterion): Measures the likelihood of a head injury. The score must be under 1000.
- G-Max: Measures the peak stopping force of a fall, which must remain under 200.
The goal of a well-engineered unitary surface is to balance daily durability with enough softness to safely cushion a fall.
The Role of the Wear and Base Layers
Unitary systems are usually built in two layers. The top “wear course” provides the color and withstands foot traffic, while the thicker base layer underneath handles the actual shock absorption. The thickness of this hidden base layer determines your CFH rating. Because material densities vary between manufacturers, always ask your supplier for the specific lab test results for the exact depth you plan to install.
Proper Depth Maintenance for Wood Chips and Rubber Mulch
Loose-fill surfacing requires ongoing attention because children naturally kick and displace the material as they play. These “kick-out zones” frequently appear at the bottom of slides, under swings, and around climbers.
If you choose Engineered Wood Fiber, keep the “compaction factor” in mind. To maintain a safe 9-inch compressed layer over time, you typically need to install about 12 inches of material on opening day.
Visual Indicators for Safety
To help your maintenance team keep depths compliant, it’s highly recommended to mark the support posts. A simple line indicating the required “finish grade” gives staff an immediate visual cue: if the wood chips drop below the line, it’s time to rake the material back into place or top it off.
Standard 2: Use Zones and Equipment Spacing Rules
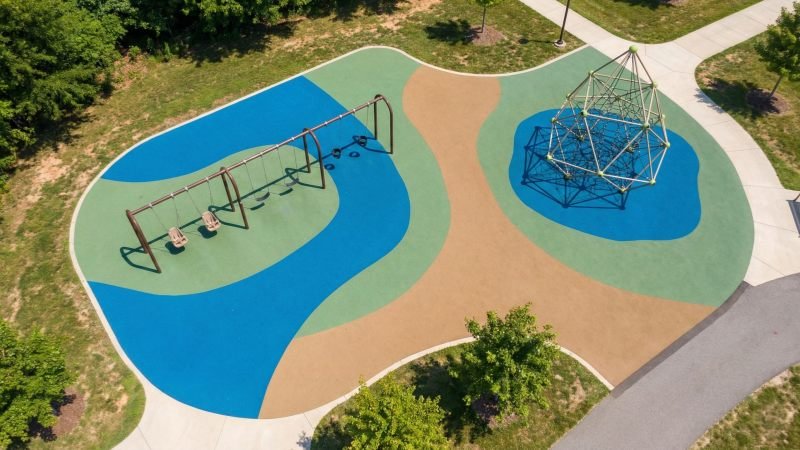
Children need room to run, jump, and fall safely. Use zones are the designated empty spaces surrounding play equipment, and they must remain completely free of obstacles like benches, fences, or other play structures.
Minimum Clearance Zones for Fall Protection
The golden rule for playground layout is the 6-foot rule. For most stationary equipment, you must maintain a clear, surfaced area extending 6 feet (1.8 meters) outward in all directions from the outermost edge of the structure. It’s important to measure from the furthest protruding part of the climber or platform, not just the center post.
Exception: Equipment designed strictly for toddlers aged 6-23 months can sometimes feature a reduced use zone of 3 feet, depending on height and design.
Preventing Overlap Between Moving and Stationary Equipment
Playground layouts often try to overlap use zones to save space. While ASTM standards permit some overlap, there are strict limits depending on whether the equipment is “static” (stationary, like a platform) or “dynamic” (moving, like a swing).
Static vs. Dynamic Play
- Static to Static: Two stationary structures can share a use zone. If they are placed 6 feet apart, their zones overlap perfectly in the middle, saving space.
- Static to Dynamic: You generally cannot overlap the use zone of a moving component with a stationary one. A child coming off a slide cannot stop instantly, so their path must be clear of nearby climbers.
- Dynamic to Dynamic: Moving components almost never share use zones.
Overlap Permissibility Guide
| Equipment Relationship | Can Use Zones Overlap? | Minimum Distance Between Structures |
|---|---|---|
| Stationary & Stationary | Yes | 6 feet |
| Stationary & Moving | No | 9 feet (typically 6ft + existing zone) |
| Moving & Moving | No | Sum of both use zones |
Specific Buffer Requirements for Swings and Slides
Equipment that generates momentum requires much larger safety envelopes.
Belt Swings (To-Fro Motion)
Swings demand a long, rectangular use zone. The required length is calculated as 2 x Pivot Height (the height where the chain meets the top beam) extending to both the front and the back. For example, an 8-foot-high swing beam requires a clearance of 16 feet forward and 16 feet backward, totaling 32 feet of clear space.
Slide Exit Zones
A child exiting a slide needs forward stopping room. For slides taller than 4 feet, the exit zone is calculated as Slide Height plus 4 feet (capped at a maximum requirement of 14 feet). The minimum exit zone is never less than 6 feet. This run-out area must be entirely clear of other equipment.
Standard 3: Hardware Hazards and Entrapment Prevention
Often called “silent killers” during safety audits, entrapment and hardware hazards are easily overlooked by the untrained eye but pose serious risks for entanglement or strangulation.

Protrusion Tests to Avoid Clothing Entanglement
A protrusion is any piece of hardware that sticks out from the equipment surface. Even a seemingly smooth bolt can be dangerous if a child’s hood string or jacket catches on it as they run past. Inspectors use specific projection gauges to ensure bolts and hardware sit flush enough to prevent clothing entanglement.
The Hook Effect
Hardware that increases in size as it extends from the surface creates a dangerous hook. A prime example is an open S-hook on a swing set chain. CPSC standards dictate that all S-hooks must be clamped tightly closed, leaving a gap no larger than 0.04 inches (about the thickness of a dime) to prevent snagging.
Head and Neck Entrapment Probe Protocols
Entrapment occurs when an opening is large enough for a child’s body to slip through, but too small for their head. If a child enters an opening feet-first and gets stuck at the neck, it creates a severe hazard.
The industry tests this using two templates: a flat Torso Probe (about 3.5 inches) and a round Head Probe (about 9 inches).
- If the small torso probe fits into a gap, the large head probe must also be able to pass through.
- If the head probe gets stuck, the gap is non-compliant.
Common Entrapment Zones
| Location | Risk Description | Compliance Target |
|---|---|---|
| Ladder Rungs | Space between steps | Must be < 3.5″ or > 9″ |
| Deck Railings | Vertical slats | Must be < 3.5″ or > 9″ |
| Cargo Nets | Grid openings | Must not stretch to entrapment size |
Rule of thumb: Gaps under 3.5 inches keep the body out entirely. Gaps over 9 inches allow the head to pass safely.
Crush and Shear Point Elimination in Moving Parts
Anywhere two components move against one another—such as on a seesaw or suspension bridge—there is a risk of fingers getting pinched, sheared, or crushed.
The Dowel Test
Inspectors test moving gaps using a 0.1875-inch (3/16 inch) dowel rod. If the rod can fit into a moving gap, that gap must never close to less than 0.5 inches during movement. If it does, the mechanism must be covered or guarded so small fingers cannot enter it at all.
The Roller Slide Exception
Roller slides have distinct requirements. The spacing between the rolling logs must be kept incredibly tight to prevent a child’s fingers from sliding down between the rollers as they spin.
Standard 4: Age Appropriate Design Separation
Children possess vastly different motor skills, balance, and spatial awareness depending on their age. CPSC guidelines strongly recommend separating playgrounds into distinct age zones to prevent accidental collisions and ensure the equipment matches the users’ developmental stage.

Distinct Zones for Toddlers Ages 6 to 23 Months
Infants and toddlers are just mastering basic walking and balance. Their play areas should focus on sensory exploration and low-to-the-ground activities rather than physical exertion. Because they lack upper body strength, vertical sliding poles and monkey bars are omitted in favor of small ramps, enclosed stairs, and low-profile spring riders. Designing a gentle physical buffer, such as landscaping or low fencing, helps keep fast-moving older kids from accidentally running through the toddler space.
Separation Criteria for Preschool versus School Age Children
The most critical division happens between the 2–5 age group (Preschool) and the 5–12 age group (School Age). Older children move faster and seek height and challenge, which can easily overwhelm younger children who have a higher center of gravity and less grip strength.
Equipment Suitability Comparison
| Feature | Preschool (2–5 Years) | School Age (5–12 Years) |
|---|---|---|
| Overhead Rings/Monkey Bars | Not Recommended | Recommended |
| Vertical Sliding Poles | Not Recommended | Allowed |
| Spiral Slides | Limited (Must have <360° turn) | Allowed |
| Stair Riser Height | Maximum 7 inches | Maximum 8 inches |
A smart layout naturally filters children to the right spaces. Placing the 2–5 area closer to seating lets parents stay within arm’s reach, while the 5–12 structures can sit further back.
Signage Requirements for Age Designation
ASTM F1487 requires manufacturers to provide age-appropriate labeling. As the site owner, you must ensure these signs remain visible. Clear signage defining “Ages 2–5” or “Ages 5–12”, along with adult supervision reminders and hot surface warnings, clearly communicates the intended safe use of the space to parents and caregivers.
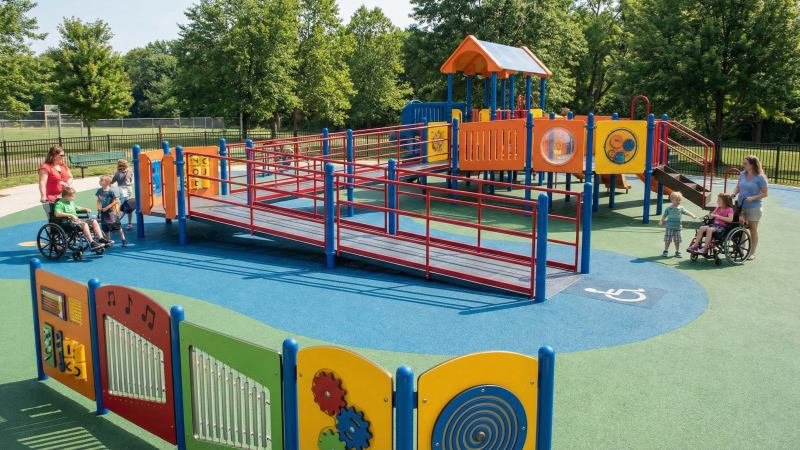
Standard 5: ADA Accessibility and Inclusive Design Compliance
True playground inclusion means ensuring children with physical disabilities can actively engage with the space, not just watch from the sidelines. The 2010 ADA Standards for Accessible Design lay out strict benchmarks for access routes and equipment ratios.
Ground Level Play Component Routes and Ratios
The ADA requires a meaningful balance of play activities. You cannot restrict all the engaging elements to the upper decks; there must be equitable play experiences happening at the ground level.
The One of Each Type Rule
When providing ground-level components for accessibility, variety matters. Providing three identical learning panels doesn’t meet the intent of the law. You need distinct types of play, such as one musical instrument, one solitary spinner, and one accessible rocker.
Minimum Ground Level Requirements
The required number of accessible ground components scales with the size of your overall structure.
| Number of Elevated Play Components Provided | Minimum Number of Ground Level Play Components Required | Minimum Number of Different Types Required |
| 1 | Not applicable | Not applicable |
| 2 to 4 | 1 | 1 |
| 5 to 7 | 2 | 2 |
| 8 to 10 | 3 | 3 |
| 11 to 13 | 4 | 3 |
| 14 to 16 | 5 | 3 |
Always verify your specific design counts with your manufacturer to ensure ADA compliance.
Transfer Systems and Ramps for Elevated Structures
To give children using mobility devices access to elevated decks, playgrounds utilize two main methods:
- Ramps: The preferred method, allowing a child to remain in their wheelchair. They require a gentle 1:12 slope and flat resting landings, taking up a significant amount of space.
- Transfer Systems: A space-saving alternative featuring a transfer platform (11 to 18 inches high) where a child can safely transition out of their chair, followed by shallow transfer steps with handrails to help them navigate up to the main decks.
Wheelchair Accessible Surfacing Standards
While ASTM F1292 tests how well a surface absorbs a fall, ASTM F1951 tests maneuverability—specifically, how much force is required to push a wheelchair across it.
- Loose fill like sand or gravel fails this test entirely because wheels sink.
- Engineered Wood Fiber (EWF) passes only if it is meticulously compacted and maintained.
- Unitary surfaces (PIP rubber or tiles) provide the easiest, most reliable accessibility, offering a firm, stable route for mobility devices.
The Accessible Route
Playgrounds must feature a clear, continuous path of travel (at least 60 inches wide to allow wheelchairs to turn) connecting the entrance of the park directly to the transfer stations and ground-level play activities.
Ensuring Long Term Compliance Through Maintenance
Safety is a continuous commitment. Passing an initial inspection on opening day doesn’t guarantee the playground will remain safe years down the road. Regular wear and tear, weather, and heavy use require a proactive maintenance schedule to prevent hazards and reduce liability.

Frequency of High Wear Part Checks
Components that bear weight and motion deteriorate faster than static posts. Moving parts require close, frequent observation to ensure they haven’t worn past safe tolerances.
The 50 Percent Wear Rule for Hardware
Items like S-hooks, shackles, and swing chains experience constant metal-on-metal friction. Industry best practice dictates a strict threshold:
- If a link or hook has lost 20% to 30% of its original thickness, order replacement parts.
- If wear reaches 50%, the equipment must be removed from service immediately until fixed.
Moving Parts Inspection Checklist
| Component | What to Look For | Action Required |
|---|---|---|
| Swing Hangers | Excessive squeaking or grinding | Grease bushings or replace bearings |
| S-Hooks | Gaps opening up (>0.04″) | Close gap with pliers or replace |
| Pivot Points | Lateral “slop” or looseness | Tighten bolts or replace nylon bushings |
| Tube Slides | Cracks at flange connections | Tighten hardware or patch plastic |
Scheduling Certified CPSI Audits
While your daily maintenance staff is great for spotting obvious issues like broken plastic or low mulch levels, finding subtle compliance violations requires a Certified Playground Safety Inspector (CPSI).
The Annual Audit
It is highly recommended to have a CPSI conduct a comprehensive audit annually. They will use the exact protrusion gauges and entrapment probes outlined in the standards above to check for “creeping” non-compliance, such as shifting foundations, UV degradation, or hardware loosening over time. Any hazards flagged in their report should be treated as high-priority work orders.
Documentation and Logbook Best Practices
In the event of an accident, a well-kept maintenance log is your facility’s best proof of diligence. Performing a repair without documenting it leaves you vulnerable to negligence claims.
What to Record
Keep your logs detailed and specific. Every entry should capture:
- Date and Time of the inspection.
- Name of the person performing the check.
- Issue Found (e.g., “Bay 2 swing chain worn 40%”).
- Corrective Action Taken (e.g., “Replaced chain, verified 18-inch ground clearance”).
Digital vs. Physical Logs
Digital asset management apps allow staff to snap photos of repairs and upload them instantly to the cloud, ensuring records are never lost. Whether you use an app or a physical binder, retain these maintenance records for the lifetime of the playground equipment.
Conclusion
Building a commercial playground requires balancing fun, accessibility, and strict adherence to CPSC and ASTM safety standards. By maintaining proper protective surfacing, honoring use zones, eliminating entrapment hazards, and thoughtfully separating age groups, you create an environment where children can play freely and safely.
Remember that compliance doesn’t end after installation. Committing to routine inspections and diligent maintenance ensures your playground remains a vibrant, safe community asset for years to come.